Wednesday, August 15, 2012
Sad day for us...
Our dear Lenny fish is gone. He was fine last night when I fed him right before bed, but I noticed he wasn't moving when I walked by his vase this afternoon. He's scared me before by being so low to the bottom, and I'd always tap the glass or shake his vase a little and he'd start moving. (Sorry I disrupted your naps all those times, Lenny!) But, today he wasn't napping. :( When I told Keenan he had gone to fishy heaven, he cried. We talked for a while ... Keenan brought up how happy we were on the day we got him. He was our first pet and K was so proud to bring him home! He lived with us for a year and a half. We decided together to give him a proper burial. We dug a hole in the back of the yard, Keenan drew a cross in the dirt and topped it with decorative rocks. It may seem silly, but it was therapeutic. Goodbye Lenny fish, we'll miss you so.
Monday, August 6, 2012
Back to School!
Wow, it's been a while! We've been super busy getting ready for our first homeschool year. Today was our first day of 1st grade and it went pretty well. I took some pictures of the room & my cute little students, so this post will be pretty image-heavy. :)
I wanted to make today special, so that K would be excited about school. So, the first thing we did was make a big breakfast together. Keenan helped with the pancakes...
Here are a couple pictures I took of the school room. Reading corner, then Math corner. I do realize that all the decorations/posters aren't necessary for homeschool, but I love it. We could absolutely have done all our work from the sofa or the kitchen table, but I wanted a room that felt fun and "normal" to me. I went to public school, then went to college to be a teacher... my mom's a kindergarten teacher. This just feels like the right approach for us. We get the feel of a traditional classroom, but the flexibility and fun of a homeschool lifestyle. Also, in my defense, I didn't have to buy much because my mom had tons of leftovers that I could use and my in laws just love to buy dollar store posters for me to use, even the ones I don't think I need. I wish I had a before picture of the room. It was AWFUL. I love the new paint color!! (exotic sea by Valspar)
Of course, I made Keenan take some pictures before we got started... just like I would have if he had headed to school the old way.
Ella mostly liked reading time & went kind of crazy during the rest of the day. I had coloring books and little containers of small toys for her to play with while I taught Keenan.
Overall, we had a great day. We mixed in some fun stuff with the boring work, and actually finished more of the things I had planned than I figured we would. Here's to a great school year!
Tuesday, May 8, 2012
DIY Abby Cadabby!
I had so much fun creating things for Ella's 2nd birthday party. Abby Cadabby was such a fun theme... I love the colors, I love the girly-ness, and I LOVE the look on Ella's face when she saw our house transformed into a magical fairy land. Everything was Abby-fied! She loved it.
Here are just a few things that I made for the party:
Abby Cadabby headband - It's actually unfinished. I wanted to add little white felt flowers around the pigtails, but ran out of time. Ella only wore it for a few minutes anyway! :)
A cute little Sesame Street birthday sign. This was the easiest thing to make because most of the work was done in Paintshop. Then I just had to print and cut it out. It was a rushed job.
I take that back... THIS was the easiest thing to do. Technically, it shouldn't really be in the DIY post because all I did was add ribbons to store bought cotton candy. This is what we used as one of the party favors. It was a hit with the kids.
Here are just a few things that I made for the party:
Abby Cadabby headband - It's actually unfinished. I wanted to add little white felt flowers around the pigtails, but ran out of time. Ella only wore it for a few minutes anyway! :)
Cupcake stand Tutu skirt in Abby Cadabby colors! Took lots of tulle, but was super cute.
Birthday Banner: Happy 2nd Birthday Ella!
A cute little Sesame Street birthday sign. This was the easiest thing to make because most of the work was done in Paintshop. Then I just had to print and cut it out. It was a rushed job.
I take that back... THIS was the easiest thing to do. Technically, it shouldn't really be in the DIY post because all I did was add ribbons to store bought cotton candy. This is what we used as one of the party favors. It was a hit with the kids.
Monday, May 7, 2012
What's for Dinner?
Spicy Ranch Chicken & Sauteed Squash
This is one of my 'go-to' dinner combinations ... both are delicious on their own, but my family just loves them together! We usually just pick something random to add as an extra side. I am not a gourmet chef by any means. I cook from a box, too. :) Tonight it was this:
For the Spicy Ranch Chicken, you need:
4 boneless skinless chicken breasts or 8 boneless skinless chicken breast tenders
1/2 cup Italian bread crumbs (plus some extra for pan)
3 tablespoons of Hidden Valley dry Spicy Ranch Dressing mix
For the Spicy Ranch Chicken, you need:
4 boneless skinless chicken breasts or 8 boneless skinless chicken breast tenders
1/2 cup Italian bread crumbs (plus some extra for pan)
3 tablespoons of Hidden Valley dry Spicy Ranch Dressing mix
Pre-heat oven to 375°.
4 small yellow squash, sliced
3 medium zucchini, sliced
1/4 cup butter
2 medium onions, sliced thinly or diced
salt & pepper
Melt butter in large skillet.
Spray bottom of 9x13 baking dish with non stick cooking spray, then coat pan with extra bread crumbs. *For easier clean up, I line my pan with aluminum foil first. The crusty remains of the chicken can be hard to scrape off of the baking dish afterwards.
Mix dry Ranch Dressing with the 1/2 cup of Italian bread crumbs, then coat both sides of chicken breasts with the mixture.
Place in pan and cook anywhere from 30-60 minutes, depending on your oven. About 35 minutes is what works for me. It's delicious and the easiest thing ever to cook!
Now, these. squash. They just melt in your mouth. I used to cook mine differently, but after trying it this way I'll never go back. This could be something really common that everyone does... but I'll add the recipe anyway.
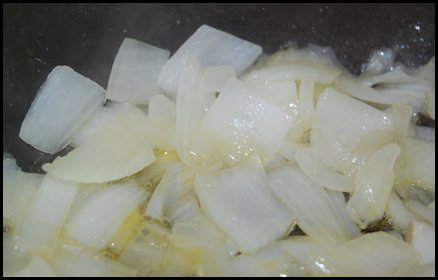
- Add onion and cook just till tender. *we like lots of onion, you can just add one if you like less.Add squash & continue cooking over medium heat, stirring until squash begins to soften.
- Cover and continue cooking over low heat until nice and tender (about 30 minutes).
Monday, April 30, 2012
Happy 2nd Birthday!
Ella is TWO!
I cannot believe that my sweet baby is 2 years old. It seems like just yesterday that we were anxiously awaiting her arrival. She's grown into such a fun, smart, adorable little girl & I guess she's officially not a baby anymore! *tear*
Well, since this is a new blog I should formally introduce you:
Ella Claire was born April 30th at 8:08 am, weighing in at 9 lbs, 1 oz & she was 21 inches long!
It was love at first sight!
Keenan was so excited- such a proud big brother!
This last picture is from her FIRST birthday pictures. She's grown soooo much since then!
I always have at least one present waiting on my kids when they wake up on their birthday. Ella's was her beautiful Abby Cadabby doll & she also got to unwrap her new Abby dvd.
Later, she'll get a fun surprise - a cute table & chairs and a My Little Pony dollhouse with TONS of ponies/accesories. I bought both from a Facebook online yard sale. I can't believe the awesome deal I got :) She'll be one happy birthday girl!
Monday, April 23, 2012
Busy!
Oh my goodness, it has been a long time since I've visited this blog! It's been so busy over here. Easter festivities, soccer practices/games, lots of crafting in preparation for my little girl's 2nd birthday!! This month has just been flying by. I have some yummy recipes to post when I get the chance. Hopefully I'll get caught up enough to show off some of these cute Abby Cadabby party decorations I've been making for Ella's birthday party, too. I am just loving this theme - running wild with the pink, purple and aqua color theme! Oh, and tomorrow I get to join my 6 year old on his class field trip to a strawberry farm. It should be fun! Maybe I'll be posting pictures of strawberry pie soon?? Wishful thinking here... hoping for the time :)
Well, sorry for the quick catch-up post. I'll be back soon!
Thursday, April 5, 2012
Chore Chart
I have been searching for a good chore chart system for a long time. We've tried the printed sheet of paper with rows for stickers .... didn't work. I came close to getting/making one like this, that uses magnets. Then I found these awesome chore chart printables from Confessions of a Homeschooler. I love it! It has been working great so far.
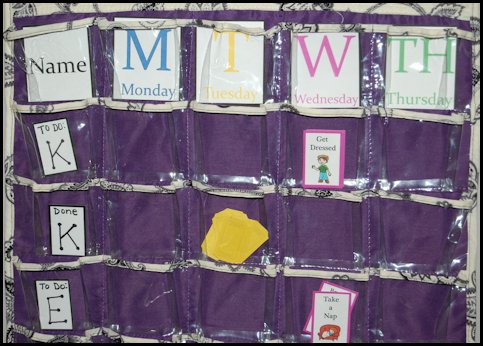
You need cardstock for printing out your chore cards, some type of hanging card holder or pocket chart to organize everything in, small reward stickers and a small prize box filled with any kind of small prizes you like. Here's a picture of our chart (front and back).
I found this nice hanging jewelry organizer at Ross for $7! I like it because it matches our dining room much better than a traditional pocket chart, so now I can hang the chore chart in a more central location in our home instead of having to hang it in the school room. I also love that it's reversible, allowing me to add in a row for Saturday and Sunday. No, I do not plan on cramming lots of chores into my kids' weekend, but I just like having the whole week on there. I only changed a few things. I created new bigger week day cards for the top row. Since I only have two kids, I didn't need the extra vertical rows so I have two rows for each child (to do:) and (done) - This is an easy way for them to move their chore cards down so they'll see how much they have accomplished and how much they have left to do.
At the end of the day, I look to see which tasks are completed and switch them out with reward tickets and stickers. I put the tickets where their completed chore cards were, and then put the chore cards in one of the extra pockets at the bottom of the chart to keep them out of the way.
I have told Keenan that he can trade each ticket for 25cents or a small prize from the prize box (*gum, candy, erasers, pencils, etc), his choice. We'll do this at the end of the week.
If your child completes all the assigned tasks in a day, they receive a sticker on their reward card. Once that reward card is full, they can exchange it for something more special from a larger prize box. *You could use things like mini-Lego sets, Pet-Shop’s, Polly Pockets, computer time, TV time, Wii Time etc.
There are also "“Best Bee-havior” cards that you can reward when your child has displayed a good attitude for the entire day, or done anything else that you deem as outstanding behavior.
If a task is not completed, the child does not earn tickets or stickers.
You need cardstock for printing out your chore cards, some type of hanging card holder or pocket chart to organize everything in, small reward stickers and a small prize box filled with any kind of small prizes you like. Here's a picture of our chart (front and back).
I found this nice hanging jewelry organizer at Ross for $7! I like it because it matches our dining room much better than a traditional pocket chart, so now I can hang the chore chart in a more central location in our home instead of having to hang it in the school room. I also love that it's reversible, allowing me to add in a row for Saturday and Sunday. No, I do not plan on cramming lots of chores into my kids' weekend, but I just like having the whole week on there. I only changed a few things. I created new bigger week day cards for the top row. Since I only have two kids, I didn't need the extra vertical rows so I have two rows for each child (to do:) and (done) - This is an easy way for them to move their chore cards down so they'll see how much they have accomplished and how much they have left to do.
close up:
At the end of the day, I look to see which tasks are completed and switch them out with reward tickets and stickers. I put the tickets where their completed chore cards were, and then put the chore cards in one of the extra pockets at the bottom of the chart to keep them out of the way.
I have told Keenan that he can trade each ticket for 25cents or a small prize from the prize box (*gum, candy, erasers, pencils, etc), his choice. We'll do this at the end of the week.
If your child completes all the assigned tasks in a day, they receive a sticker on their reward card. Once that reward card is full, they can exchange it for something more special from a larger prize box. *You could use things like mini-Lego sets, Pet-Shop’s, Polly Pockets, computer time, TV time, Wii Time etc.
There are also "“Best Bee-havior” cards that you can reward when your child has displayed a good attitude for the entire day, or done anything else that you deem as outstanding behavior.
If a task is not completed, the child does not earn tickets or stickers.
I highlighted the most important parts and/or things I have modified to suit our family's needs, but if interested in implementing this system you should really head over to Erica's blog and read the whole thing. I am so glad that I did. I can't believe that Keenan is coming to me asking to do more chores!
Here's my boy after setting the table, very proud of himself for completing one of his chores:
Ella's only 2, so she only has a few easy chores a day (get dressed, take nap, brush teeth)
Subscribe to:
Posts (Atom)